A photo is made of soft tones. A block prints ink or no ink, nothing in between. So every photo-to-block job is a translation, and printmakers have worked out several ways to do it over five centuries. Here are five of them, what each one looks like, and how to get that look from your own photo.
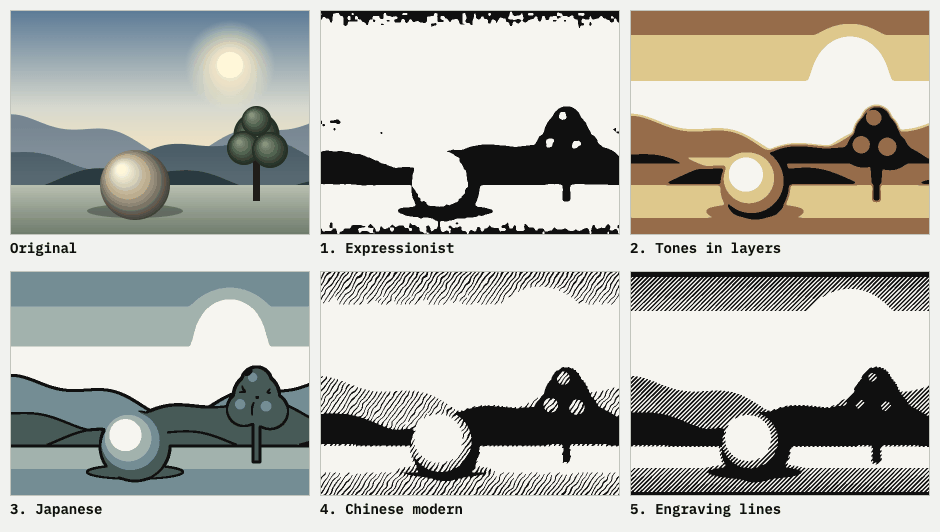
1. Expressionist woodcut: big black masses
The Die Brücke artists printed from the raised, uncut surface of the block, which gave their prints the boldness and flatness they wanted. The wood grain limits fine detail, so the cutting is rough and angular (Henze & Ketterer). From a photo: push the contrast, pick one threshold, let everything darker become solid black, and drop every speck smaller than your cut. Ragged edges are part of the look, not a flaw.
2. Tones in layers: chiaroscuro
The chiaroscuro woodcut uses two or more blocks in different colours to mimic a chiaroscuro drawing. It was probably first made by Lucas Cranach the Elder around 1508 or 1509, with a key block for the lines and one tone block. Ugo da Carpi later worked with tone blocks alone, without the key block (Wikipedia, Britannica). The price was several passes through the press, and layers that slip out of register. From a photo: split it into two to four flat tones, one block each, printed from light to dark, with the last one black.
3. Japanese: key block and colour blocks
An ukiyo-e print starts with a key block that carries the outline. Its impressions guide the carving of every colour block, one block per flat colour (Davis Art, Brooklyn Museum). Gradations (bokashi) come from wiping a moistened rag over the block or from a separate block, which is a printing technique, not something a film can show. From a photo: a thin outline as the first block, then a few flat colours, and the lightest stays paper.
4. Chinese modern woodcut: black and white, bold
The modern woodcut movement of the 1930s and 1940s, started by Lu Xun, favoured the “creative” print over the reproductive one and was mostly monochrome (SOAS, NGA). Traditional New Year prints (nianhua) are colour prints with one block per colour (Sixth Tone), which is close to the Japanese approach above. From a photo (our interpretation, not a copy): deep shadow as solid black, short knife marks in the midtones, light left white.
5. Engraving lines: tone from line width
In wood engraving there are two ways of working: black-line, where the design is the lines that stay, and white-line, where the design is the cut. Thomas Bewick pioneered white-line. Tone comes from closely spaced parallel lines: light and dark follow from how wide the cut-away and the printed lines are (Wikipedia). From a photo: parallel lines, thick where the photo is dark and thin where it is light, or the other way round for white-line, with cross-hatching in the deepest shadow. Engraving is done with a burin on end grain; on lino or plank wood your gouge cuts coarser lines, so give the lines room.
Prepare the photo first
- Strong contrast and a simple background. A busy background turns into noise in every style. Linocut leans on a strong black-and-white contrast (AKVIS).
- Simplify before you cut. Posterizing, which turns subtle shading into a few flat zones, is the usual first step (AliveColors).
- Know your smallest cut. Any line or speck smaller than your tool can cut will not survive. Lines also get lost where two cuts almost touch, so keep islands connected (see lino and block printing layers).
Do it in PrintFilmReady
In the Lino & Block tab, pick a style under the upload and set the smallest cut in mm. The tool turns your photo into the carveable image first, then separates it: one ink is one block, mirrored, with kento marks, and the film is your carving guide. You can preview every style for free; making the films with a style is part of Pro. Open the tool. The default smallest cut of 0.8 mm is an assumption: set what your own tools can make.
Which style for which photo?
- A portrait: tones in layers or the expressionist masses keep a face readable.
- A landscape or a street: the Japanese outline with colour blocks.
- A bold, graphic subject: the Chinese-style black and white.
- A face or an animal with plenty of fine tone: engraving lines, but only if you can cut fine lines.
Common questions
How do I turn a photo into a linocut?
Raise the contrast, simplify the shapes, and decide how the tones become blocks: one black block, a few tone blocks, an outline plus colour blocks, or engraving lines. Then transfer the result to the block and carve it.
Which style works best for a portrait?
Usually tones in layers (two to four flat tones) or expressionist black masses. Engraving lines need fine cuts and a lot of patience on lino.
Do I still have to carve it myself?
Yes. PrintFilmReady makes the pattern, one film per block, mirrored, with registration marks. You transfer it to the block and carve.
Are the block-print styles free?
Previewing is free. Making the films with a style is part of Pro.
Try your own photo
Pick a style under the upload in the Lino & Block tab and watch the blocks appear. Preview is free.
Built by a screen printer, for screen printers. What you tell us decides what gets built next. Write a review · Send an idea